1961 Corvette Soft Top Installation
Convertible top frames Don't Drive Topless: sale: 1963-67 ORIGINAL TOP FRAME-cleaned painted ready to use with front pins and rear pins installed., NEW VINYL TOP KIT- is included, but of course 'not installed' let your local trim shop install it to best fit your car. (choice of,white, or black or tan,) + RUBBER weather strip kit -New latches optional (extra cost $) = $2,575 KIT; reflects price increase due to limited number of frames, ^^^^^^^^^^^^^^^^^^^^^^^^^^^^^^^^^^^^^^^^^^^^^^^^^^^^^^^^^^^^^^^^^^^^^^^^^^^^^^^^^^^^^^^^^^^^^^^^ sale::: 1968-75 series = SAME kit as above $2,175; ^^^^^^^^^^^^^^^^^^^^^^^^^^^^^^^^^^^^^^^^^^^^^^^ see photos below:. 1956-62 Corvette tops: LITTLE KNOWN FACT!!!. THESE CONVERTIBLE TOP FRAMES PICTURED BELOW ARE. 'CRANE MANUFACTURED'. & ASSEMBLED TO THE ORIGINAL FACTORY G.M.
O.E.M SUPPLIERS DRAWINGS FROM 1956-1962!!!. BASIC (FRAME ONLY) KIT IS $2,095.00 (SEE OPTIONS BELOW). REALLY, THAT'S WHY THEY ARE SO EXACT in all details!!. Contacts: Postal/shipping address: Crane Corvettes, 4687 Chateau Place San Diego, Ca. 92117 Contacts: 858-864-2883 FAX: 858-514-8398 USED/vintage PARTS: 858-864-2883. STATS: about 65% of 1956-62 vettes ( 90% of california delivered.Corvettes) came with the hardtop only!!. conversion kits available to make yours a 2-top Corvette.
Install the new top with the rear edge wrapped around the rear bow, which clamps to the car. Pull the material to the front bow and around the side vertical rails. The open seam of the new top. Soft Top Pad Installation 1958-1962. Soft top Pad locator data 09152007. Category: Soft Top (Convertible Top) Tags: 1958, 1959, 1960, 1961, 1962 About Us.
C1 & C2 Corvettes - Soft Top Installation on a 1959 - The car I just bought was sold as a Hard Top only car. I am wanting to install a convertible top frame and top. Has anyone ever done this. Is it as easy as it seems to convert? If anyone has a frame for sale, let me know. Convertible Top Installs Al Knoch Interiors can set up appointments at the available car shows that we will be attending and can install any type of interior on you classic car. It's convenient, affordable, and we come straight to you for a professional install at the car shows!
NEW. NEW Key Benefits Restoring a convertible top frame ass'y can - (is) an expensive matter replacing over 20 rivets/ +bushings and rusty bows- to make them tight again etc. Tach strips / rust/ sand blasting. We have new frames 1956-62 years available made to factory OEM- chevy - Blueprints that are priced below what a recondtioned one would cost to restore! Fotoba xl 320 user manual. Click phoho - NEW AND USED CONVERTIBLE TOP FRAMES 'New' CONVERTIBLE TOP FRAMES: 1956-60 & 1961-62 NEW WITH RUBBER+ rubber steel retainers 7 pieces, +REAR trapeze SWING LATCHES that mount on the rear bow & FASTENERS kit: SALE: $2,245.00 total. Add other parts are extra $ Note: all NEW VINYL TOP KITs 1956-75 - (includes pads & straps is - on sale $249, but of course 'not installed' let your local trim shop install it to best fit your car.
^^^^^^^^^^^^^^^^^^^^^^^^^^^^^^^^^^^^^^^^^^^^^^^^^^^^^^^^^^^^^^^^^^^^^^^^^^^^^^^^^^^^^^^^^^^ + CONVERSION KITS AVAILABLE FOR Factory Born HARDTOP ONLY CARS. CALL FOR PARTS NEEDS TO COMPLETE YOURS.
Check your vette and be specific. NOTE: Add the convertible top assembly to your hardtop only car. IF YOU NEED: ' EVERYTHING to convert' a factory hardtop only car into a 2-top Convertible Corvette IT WILL RUN $3,590.00 FOR ALL LATCHES: Front and Rear Latchespictured below =clik photo to enlarge. 6/piece mounting plate set. And the vinyl top, pads and straps- including all fasteners/Bolts/ parts and exploded views and drawing of the assembly. For a ' Factory Born'hardtop only car' to convert to a 2 top corvette for 1956-62 type.
^^^^^^^^^^^^^^^^^^^^^^^^^^^^^^^^^^^^^^^^^^^^^^^^^^^^^^^^^^^^^^^^^^^^^ note: front latches with adjuster plates are now $275 set. Separately, MOUNT PLATES= $530 6/piece set. Click photo Note: All bare frames are fully assembled:: ready for installation of hardware, latches, weather stripping and vinyl top. Page: ^ ^ ^^ ^^^^^^^^^^^^^^^^^^^^^^^^^^^^^^^^^^^^^^^^^^^^^^^^^^^^^^^^^^^^ Contacts: Postal/shipping address: Crane Corvettes, 4687 Chateau Place San Diego, Ca. 92117 Contacts: 858-864-2883 FAX: 858-514-8398 USED/vintage PARTS: 858-864-2883 12 60 Convertible Top Assembly Complete Soft Top Frame Assembly ND 541055 CALL.
Kopp, May be best next time to start a new thread, but since you've reopened this old one, here are a few photos of what JohnZ mentioned. I just did this recently on a '59 that was originally hard top only.
The car was bought in 1964 with 2 tops, but the present owner was never aware it was HT only until I pointed out some clues. Scala list. It was missing the 'pieplates' and had a very rough cut decklid for the latches. Someone in the past installed a soft top, but didn't install all of the necessary supports. The large 'pieplates' are available in reproduction, as are all brackets and complete frame.
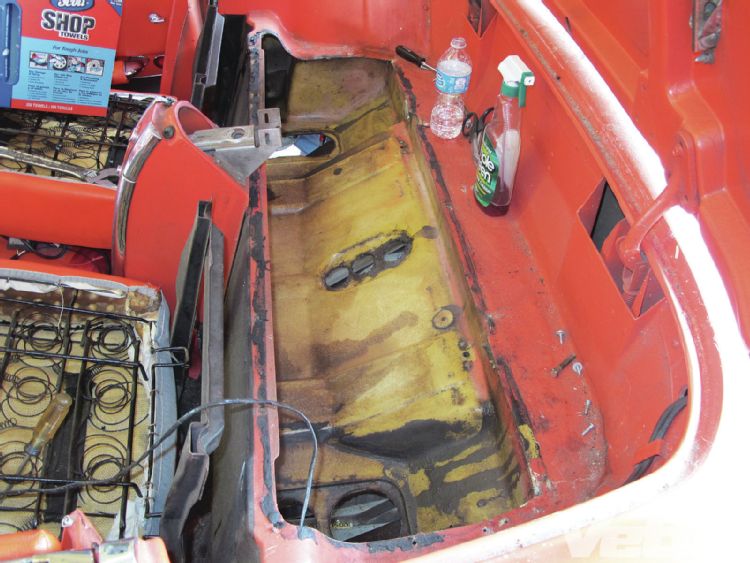
You have to remove the seatbelt brackets on the floor, then install the pieplates, then reinstall the brackets. You may have to open the mount holes in the fiberglass for the upper brackets. Behind them are threaded captive nuts in the horizontal reinforcement, which runs from left to right behind the seats. Note those are all 3/8 SAE fine thread.
1959 Corvette Soft Top Installation Instructions
Recommend you clean the threads in them but be careful near the inners as the gas tank is close to them. Also note the upper outer brackets have a hole for a 1/4-20 bolt to attach to the body, but since yours was Hardtop only, it will not have a bonded in Tee-nut to attach. You just leave that bolt out on each side.
| Special tools needed: You'll need regular pliers, needle nose pliers, punch, single edged razor blade, screw drivers, small wrenches, and strong hands. Begin by first removing the wire-on molding just above the rear window. This molding covers a seam which is present on most convertible tops. The wire-on molding is folded front to back. First remove the stainless ends usually fastened by phillips screws (ill. 1). Unfold the wire-on molding and remove the staples securing it to the top bow. This is done using a sharp punch to pry up. Usually 1/2 of the staple separates fromthe bow. Use pliers, either regular or needle nose to finish the stapleremoval. Remove all the staples securing the top seam overlap after themolding has been removed. Removethe rear weatherstrip by first finding and removing the weatherstrip retainer wire embedded within the weatherstrip (ill. 2). The weatherstrip will easily pull off once the retainer wire is removed (ill. 3). The top fabric is fastened to the rear bow by a small welt or beading stiched into the fabric edge and tucked into a groove in the bow. Use a screw driver to untuck the top fabric from the rear bow(ill. 2). Removeall front weatherstrip which include front center, left and right corners. The center weatherstrip is secured by plastic push in studs embedded into the weatherstrip and spaced approximately six inches apart. Much care should be taken when desecuring the plastic studs from the bow (ill.5). The studs are t-shaped therefore pry them loose with a screw driver placed next to the stud. The corner weatherstrips are secured by two metal push in clips, one plastic push in clip, one phillips screw, and one threaded embedded steel stud. Pry the clips loose in the same manner used when removing the centerweather plastic studs (ill. 4). Unscrew the screw and removethe one nut on the back side of the side rail. Removethe front fabric molding staples, then the top fabric wrap aroundstaples(ill.5). The top is then fastened only by the sideverticle weatherstrip studs. The quick way to remove the side verticalweatherstrip is done using a single edge razor blade to slice the top materialfacilitating easy access to the weatherstrip stud nuts (ill.6).There are three nuts and washers that need to be removed. The old top isthen removed exposing the top pads (ill.7). The top padsand adjacent straps are replaced one at a time so as not to disturb existingtop bow alignment. Before changing pads and straps we must repair the existingfront bow rot. We were very surprised to find the extent of ruston the front bow as we did on this particular Corvette. In fact the entireframe of the car was in much better condition. The only explanation wecould surmize was that the top had been replaced once before many yearsago and the fabric wrapped around the front bow had been trimmed short,exposing a surface that we find typically covered by fabric. Since therust was isolated we weighed the cost factors involved in replacing thefront bow as compared with its repair. A new bow cost approximately $300.00and requires three or four hours for installation since their fit is notas good as one might expect. We estimated six to eight hours to repairthe existing bow not unlike the many we had repaired over the years priorto this replacement part's availability. The repair would result in a substantialsavings for the customer when considering our shop rate and no delay inprogress . Repairrusted front front bow by first grinding the rusted surface (ill. 7). The pitted areas are then ground using a die grinder (ill. 8). This process is similar to a dentist preparing a tooth for a filling. Sheet metal plates approximately .020 to .030 inch thick are then fabricated and fitted over the rotted areas (ill. 8). The repair plates are then mig welded in place (ill. 9). The welds are then ground flat and the entire repair area is also lightly ground in preparation for body filler application. Apply a light coat of body filler. Trim or cheese grade when half hard. Sand and shape the body filler as needed when completely cured (ill. 9). Installfront tack strip: The original tack strip, (what the top fabricstaples are secured to), usually survive. This is one of those rare timesthat require its replacement. Oddly enough the original tack strip fromthis car was in excellent shape but we opted to replace it with a woodenreplacement. The factory tack strip and the aftermarket reproduction aremade from a fiber board, paper-like material. We have found that a softwood replacement holds the staples better and will probably out live itsoriginal counter part. We discovered this process many years ago when noreplacement part was available. The wood we use is from a yard stick whichused to be given away free from most hardware store and lumber yards (ill.10). The yard stick is cut approximately 5/8 inch wide and a numberof pieces are cut to eight to ten inch lengths. The pieces are fitted andtrimmed as necessary. When satisfied with the overall fit they are bondedinto place using body filler. The factory tabs are then rebent over thenew tack strip (ill. 10). The entire header bar is then primedand painted gloss black lacquer. Checkthe dimensions and fit and orientation of the old pads and strapsbefore commiting to their replacement.We have found that old pads and strapsshrink a bit with age. It is not necessary to use a tape measureextensively for this procedure, rather a prefit of the new top will bestdetermine if any change in pad length is necessary. The critical item isthe location of the rear tack strip bow, (where the wire-on molding waspreviously secured). There is a chance that this bow crept forward slightlywith the aging pads. Install the new top with the rear edge wrapped aroundthe rear bow, which clamps to the car. Pull the material to the front bowand around the side vertical rails. The open seam of the new top shouldbe locating exactly over the rear tack strip bow. A close inspection ofthe ends, left and right, will show that this seam is comprised of two1/2 inch wide flaps that overlap each other. The point where they overlapwill be stapled to the rear tack strip so the staple point should locateprecisely over the middle of the tack strip (ill. 18). Youwill need to pull back on the rear tack strip bow while pulling forwardon the new top material to accurately check this fit. Begininstalling one new pad first. Check the distance between the tackstrip bow and the rear bow on the other side for reference (ill.12). Remove all staples. You will find that the generally practicedrule with pad fastening does not render staples on a surface adjacent tothe top material. The new pad is placed with the rear tack bow properlyplaced and properly aligned over the side rail with no pad material appearingbelow the side rail bottom surface. Remove the inside padding materialbefore stapling into place. The pad is then stapled first at the frontbow, then rear tack bow and then the middle (ill. 13). Installthe padding and properly place the outer pad covers as illustrated (ill.13). Apply adhesive to the two surfaces that will meet each other.Allow adhesive to dry before joining. The overlapped seams are then taped.Apply adhesive to the area that will be taped then apply the tape. Installthe top straps using a punch to locate holes in the rear bow (ill.14). Check the distance measurement reference taken from the oppositeside. The strap is stapled to the rear tack strip bow under the pad (ill.14). With the front clamped and the rear latched two notches thestraps and pads should appear taught leaving approximately 1/2 inch clearanceunder the rear bow between it and the body. This Article is Continued. . . . |
|
Copyright © 1999 Rowley Corvette Supply, Incorporated
All Rights Reserved